


- Overviews
- East India Company
- Pirate Bay
- Privateer
- Designer's Cut
- Battle of Trafalgar
- Collection
- Ship Introductions
- Designer's Blog
- Developer's Video Diary
- Modding Instructions-series
 9th October 2009:
Modding part 6.
This time we learn how to translate the East India Company to your own language.
Read more » 15th July 2009:
Naval warfare, part II.
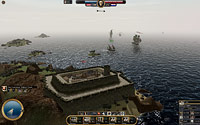
Lead designer Kim Soares takes the helm of a frigate and shouts: "Port side, FIRE!"
Read more »
 Keep yourself posted on the latest news about East India Company.
Email-address:
 Sign up for the Paradox newsletter, and get all the news directly from Paradox Interactive.
Email-address:


Modding Instructions Part 1 - Texture Basics

Hello to everyone!
My name is Niko Pesonen and I'm the Lead Animator at Nitrogames. This is a first post in the series of tutorials for modding EIC. In the first parts we'll focus on modding the game graphics, but later on we'll pay more attention to things like AI, audio, weather etc.
Basicly all the textures in EIC can be modified. These include ships, characters, buildings, terrain surface, particle textures and the whole GUI (user interface). You can also make modifications to the weather, time of day and waves. But before we go through any of that I'll start with the basics of modding textures in Photoshop.
Texture locations
First of all you need to locate the texture files. So here goes.
The default installation folder is:
c:\program files\paradox interactive\east india company\
The sub-folders are found as shown below.
Terrain textures:
Data\Textures\Terrain\
Particle textures:
Data\Textures\Particles\
Decals:
Data\Textures\Decals\
Characters:
Data\Models\Characters\
Flags:
Data\Models\Flags\
Ships:
Data\Models\Ships\
GUI:
Data\GUI\
In the folders you see diffuse textures as well as normal maps. Normal maps are usually labeled xxx_NM.dds. Some models also use specular maps. To see which model uses which textures you can open up the 3D model file (.3DS) in hex editor. The textures are usually listed in the beginning of the file. In most cases the textures are stored in the same folder with the model file and named accordingly so you don’t need hex editor to figure out which textures belong to certain 3D model.
If you don't have a hex editor, you can use Notepad ++ - download it from here:
http://notepad-plus.sourceforge.net/uk/download.php
DDS plug-in
Since all the textures are in dds-format (DirectDraw Surface) you first need to download and install the plugin from Nvidia:
http://developer.nvidia.com/object/photoshop_dds_plugins.html
Import to Photoshop
Now we are ready to import files to Photoshop.
1.In Photoshop click File->Open...
2.Then select the dds-file of your choice.
3.Now the plug-in ask you about the read properties of the file. We'll choose the settings shown below. If you want to import the image without MIP maps, just uncheck the Load MIP maps.

Now you are ready to start editing the texture of your choice.
Here's an example (Data\Models\Characters\NavalOfficer\01\NavalOfficer_Body_DM_01):
(Click the image for a larger version.)

As you can see there's a larger image and then smaller versions of the same texture. These are called MIP maps and are used when the texture is further away from the camera. The MIP maps are also used when using lower texture detail level in game options.
Note:
In most cases its best to open the image without "Load MIP maps" selected and let the plugin generate the MIP maps once saving the file.
Saving the File
There are a few important things you need to know when saving the file
because there are several format options to the dds-file.
It's strongly recommended to flatten the layers in the image before saving it as dds file.
Fist click File->Save As...
Now, you'll get a list of options to choose from. (below)
(Click the image for a larger version.)

In here you need to choose the right options for a specific image.
If you are saving an image which doesn't have an aplha channel (transparency) you need to choose
DXT1 RGB 4 bpp no alpha.
If the image has an alpha channel, you need to select DXT5 ARGB 8 bpp interpolated alpha.
For the GUI textures you would want to choose the 8.8.8.8 ARGB 32 bpp unsigned.
You also have to select the right option for the MIP Map Generation. If you are saving a file which doesn't contain MIP maps, but you want them to be generated, choose Generate MIP maps.
If the image already has MIP maps and you want to use the existing MIP maps, choose Use Existing MIP maps.
If you don't want to use MIP maps at all, choose No MIP maps.
After choosing the correct options here you are ready to save!
Run EIC and see how the changes you made appear ingame.
So thats all for today. I'll hope this helps you getting started with modifying the textures in EIC. Next time we'll go into more detail about editing the images.
Best,
Niko