


- Overviews
- East India Company
- Pirate Bay
- Privateer
- Designer's Cut
- Battle of Trafalgar
- Collection
- Ship Introductions
- Designer's Blog
- Developer's Video Diary
- Modding Instructions-series

 9th October 2009:
Modding part 6.
This time we learn how to translate the East India Company to your own language.
Read more » 15th July 2009:
Naval warfare, part II.
Lead designer Kim Soares takes the helm of a frigate and shouts: "Port side, FIRE!"
Read more »
 Keep yourself posted on the latest news about East India Company.
Email-address:
 Sign up for the Paradox newsletter, and get all the news directly from Paradox Interactive.
Email-address:


Modding Instructions Part 2 - Charater Texture
Hi all!
I though it would be nice for those of you that are interested in making modifications to the game but do not yet have all the knowledge how to go about it, to give you an idea how to start modding the textures.
This time around we are going to take a look at a simple modification to a Naval Officers clothes in Photoshop.
Ok. Here we go.
In the last tutorial we looked at opening and saving files, so I'm not going to go through much of that. First of all you have to open up the appropriate file in Photoshop. I'm going to use the Naval Officer found in: ...Data\Models\Characters\NavalOfficer\01\NavalOfficer_Body_DM_01.dds.
We are not going to make any changes to the mipmaps, so load the image without them and choose Load Using Default Sizes.

So this is what it looks like:
(Click the image for a larger version.)

As you can see this is just the body, so if you want to make changes to the head you'll have to open up the head file. We are going to leave the head as it is for now.
Modding this kind of a texture could be a little taunting task. It is sometimes very hard to see what's going on in the image. Basically the technique is to take pieces of the 3d-model and lay them down on a flat surface and start painting on them. Unfortunately you can't see the polygons that make up the model in photoshop so this takes a little time to get used to. There's always some guesswork and trial and error involved in modifying existing textures.
Ok. I'm not going to scare you anymore :)
Let's take a look at the texture and make some adjustments to it.
Basically you can do anything you want to it. It all depends on your skill level.
I'm just going to give a simple demonstration how to change the color of the jacket an paint a logo on the back.
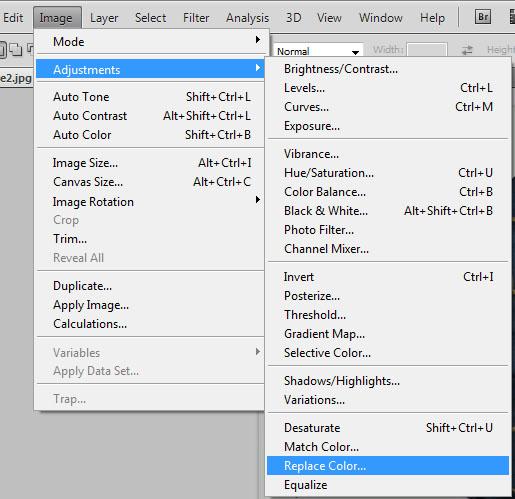
For the color change we'll use the Replace Color adjustment:
(Click the image for a larger version.)
Now you'll have to choose a color you want to replace by using the eye dropper tool and selecting e neutral blueish color as shown with the red circle.
(Click the image for a larger version.)

Adjust the fuzziness to somewhere around 55. The fuzziness controls the amount of tolerance you have in your selection. The bigger the number, the more colorinformation it selects. The areas or color you have chosen is represented with the black and white image. You can also add more color to your selection with the eye dropper with the + -sign next to it.
As you can see, we have selected most of the blue color and now it's time to replace those areas with another color.
We'll do that by adjusting the three bottom sliders. (Hue, Saturation and Lightness)
By adjusting hue you basically change the color. Saturation equals the amount of color you want.
-100 = grayscale image, +100 = fully saturated image.
Lightness is for making the selected area darker or brighter.
I'll adjust the Hue to +150 to replace the blue color with a red. And here's what it looks like now:
(Click the image for a larger version.)

This is of course just one way to change the color and surely not always the best way. But this is not the forum to teach photoshop. :)
What we'll do next to finish the texture, is to add a logo on the back of the character.
We'll need another layer. So to do that press Shift+Ctrl+N.
Now we have created another layer and to that layer we are going to create a simple image.
Choose the Custom Shape Tool from the toolbar and select the color you want for your shape:
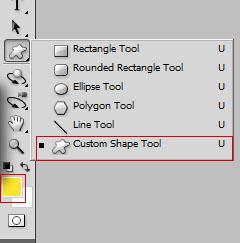
Select "Fill pixels" and select the shape you want from the dropdown menu as shown below:

Then just draw the shape on top of the image.
Here's what it looks like:
(Click the image for a larger version.)

I'll rotate the shape 90 degrees clockwise by choosing:
(Click the image for a larger version.)

Then position the shape and blend the shape to the texture by using for example a soft light -mode in the layers panel:
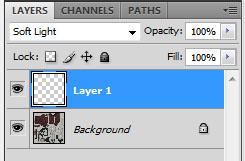
So here's the final result:
(Click the image for a larger version.)

Since we didn't open up the the image with the mipmaps, we are able to save all these changes to all the mipmap -levels by simply saving the file with "Generate MIP maps" on. This way the dds plugin generates the mipmaps from this single image.
Word of Warning:
Do not replace the original files with the modified ones before you have made a copy of the original one!!!
Final words.
Again I have to point out that this was by no means the perfect and only way to approach this.
You, who already master photoshop will propably figure out much "cooler" ways to produce the textures you want. I still hope this example gives you the main idea behind modding the characters' textures. Later on we'll look at modifying the normal maps and some other types of textures. So it's bye for now, and I'll post more examples soon!
Oh! By the way, there is a section in the EIC forum titled EIC- User Modifications.
If you have any questions or ideas about a topic or whatever, go the and we we'll look into it and see what we can do for you.
Best,
Niko