- Overviews
- East India Company
- Pirate Bay
- Privateer
- Designer's Cut
- Battle of Trafalgar
- Collection
- Ship Introductions
- Designer's Blog
- Developer's Video Diary
- Modding Instructions-series
 9th October 2009:
Modding part 6.
This time we learn how to translate the East India Company to your own language.
Read more » 15th July 2009:
Naval warfare, part II.
Lead designer Kim Soares takes the helm of a frigate and shouts: "Port side, FIRE!"
Read more »
 Keep yourself posted on the latest news about East India Company.
Email-address:
 Sign up for the Paradox newsletter, and get all the news directly from Paradox Interactive.
Email-address:


Modding Instructions Part 5 - Editing terrain textures
Hi all!
This time we are going to take a look at the terrain textures in the strategic view of EIC. So, to get started I've opened up two texture files: desert.dds and desert_NM.dds. You can find them from: ...\Data\Textures\Terrain\Strategic.
Here's how the two images look:
(Click the image for a larger version.)


The first one is just a simple texture file that is drawn on the strategic map. The blue one is a normal map for that texture. All textures that have a normal map have the letter NM at the end of the file name. As you can see this particular normal map has just one color so it's basically not affecting the texture. For those who aren't familiar with normal maps, here's a short explanation: Normal maps are used for creating the illusion of height differences in the 3D-model. If you are familiar with 3D-programmes you compare normal maps to bump maps. Both are used to create bumpiness or height differences in the 3D-model. They work differently, but I'm not going to go any deeper into the technical stuff here.
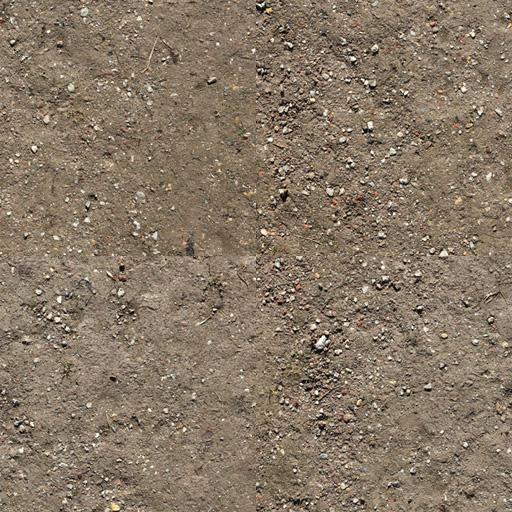
So let's get back to the base image. This texture is generated so that it is tilable. What whis means is that copies of the image can drawn next to each other so that there are no visible seams. Here's what two desert images would look next to each other:
(Click the image for a larger version.)

As you can see there is no seam between the two of them. Let's look at a simple way to accomplish this. First you need an image you want to work with. I'm going to use this sand texture here:
(Click the image for a larger version.)

Because I'm going to replace the original desert texture with a new one I'll copy this image on top of the original one. Then you propably want to resize/reposition it.
Here's what mine looks like now:
(Click the image for a larger version.)

Now it's time to flatten the image. Otherwise the thing we are going to do next will not work. Now let's make this image tilable. The easiest way to do this is to apply an Offset filter. (Filter ? Other ? Offset...) With this filter we can move the image to any coordinate in our canvas and it automatically starts to tile itself. Here's what it looks like with Offset's horizontal and vertical set to 256, 256. (Make sure wrap around is on.)
(Click the image for a larger version.)

As you can see the tiling is crearly visible here as expected. A quick way to remove the tiling is to use a clone stamp tool and paint away the seams. I'm assuming here that you are familiar with clone stamp tool. If not, there is plenty of information and tutorials on photoshop in the Internet.
This is what it looks like after the clone stamp treatment:
(Click the image for a larger version.)

You might want to use the offset again to make sure the seams are gone. Let's pretend that the image is in perfect shape :)
Now it's time to move on to the normal map. Let's copy the new desert image on top of the normal map image. Again, flatten the image. You can either apply the normal map filter to the coloured image or convert it to a grayscale image first. The normal map is basically generated accordingly to the brightness values of the image so making the image grayscale helps to see the contrast of the image a little bit better. So let's do that. (Shift+Ctrl+U) You can now adjust the image to your liking but I'm just going to use this grayscale image. Apply the normal map filter. (Filter ? NVIDIA Tools ? NormalMapFilter...)

To be able to control the normal map generation we have to look at a few things in here.
1.Filter Type - The bigger the sample, the less detail you get for the normal map. 2.Scale - The bigger the scale, the more elevation you get
Let's leave the rest to their default settings.
Here's the result:
(Click the image for a larger version.)

If you don't want the normal map to be that crisp you can always blur it with the gaussian blur for example. Save both files as DXT1 - no alpha and you are ready to go!
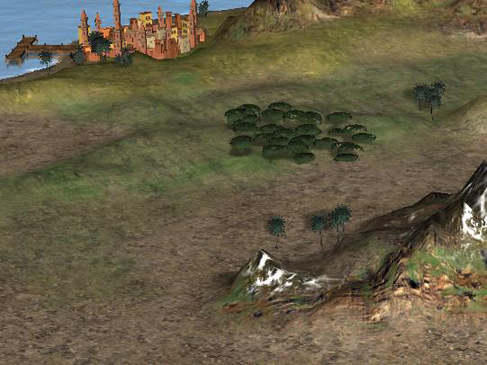
So this concludes today's tutorial. Sure, you want to see how it looks like in the game. Here's a screenshot: